
Use this guide to create a Less2More AI Ad for an eligible product. From the Dashboard, select a marketplace and product, review Product Diagnosis, set your Goal ACOS and budget, choose an AI Strategy Mode, and launch the AI Ad.
Before you start, ensure you meet the following requirements:
- Complete Authorizations: Successfully connect both SP-API and Advertising API.
- Verify Eligibility: Ensure the selected marketplace is eligible and authorizations remain valid.
Entry
On the Dashboard, find the Create AI Ad button and click it.

Creation Flow
Select store
Choose your target marketplace.
Select product
Choose the specific SKU/ASIN you want to advertise.
Product Diagnosis
After you select a product, the system checks for critical issues that may prevent you from creating an AI Ad.
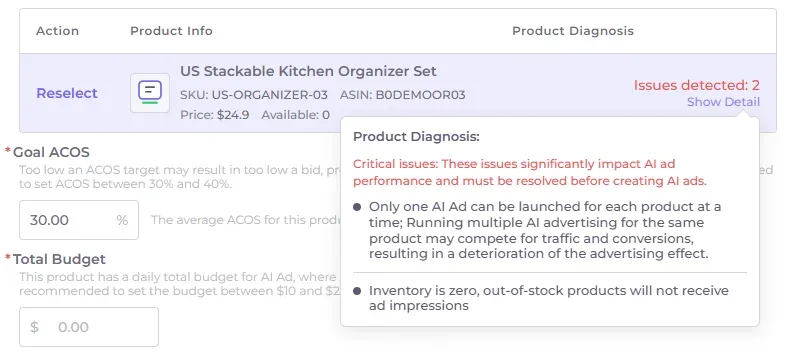
If critical issues are found, the Product Diagnosis column displays “Issues detected: {number}” in red. Hover over “Show Detail” to view the specific issues.- An AI Ad is already running or being created for the product: Only one AI Ad can be active for a product at a time. Multiple AI Ads for the same product may compete for traffic and conversions, which can affect ad performance. If an existing AI Ad is running, pause it before creating a new one. If its status is “Creating”, wait until the toggle becomes available, and then pause it. You can also select a different product.
- The product is out of stock: Products with zero available inventory cannot receive ad impressions. Replenish the inventory before creating an AI Ad, or select a different product.
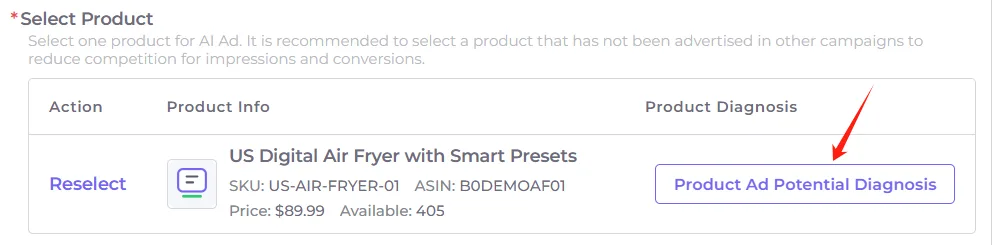
If no critical issues are found, click “Product Ad Potential Diagnosis” to open the “Advertising Product Quality Score” dialog. It displays the product’s score and optimization recommendations.
The score evaluates three areas:
- Competition: Conversion rate compared with the category average; traffic from at least three keywords; rating count; and average rating.
- Listing Info: Product images, main image dimensions, videos, bullet points, A+ Content, product description, and title.
- Other: Inventory coverage, orders in the past 30 days, and whether the product appears in other advertising campaigns.
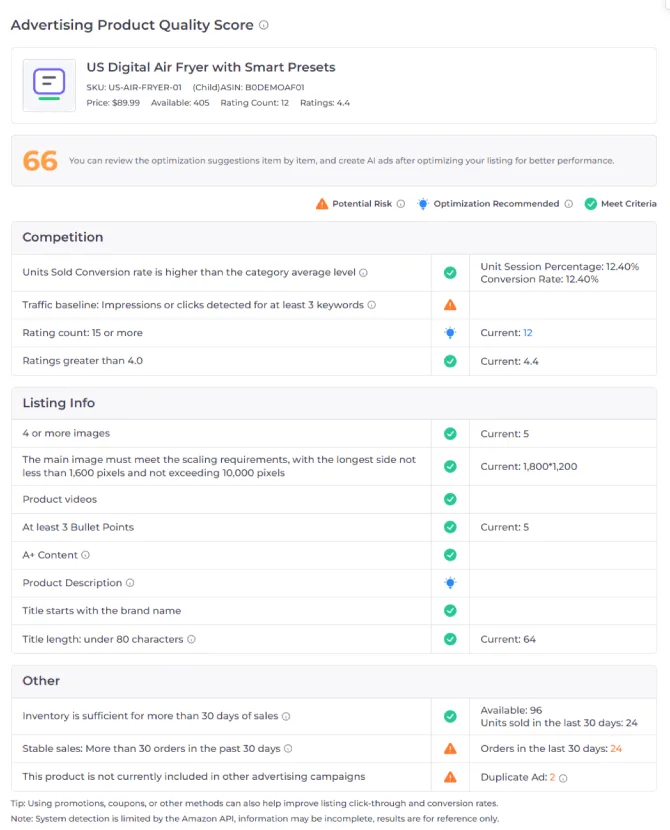
Note: System detection is limited by the Amazon API. Some information may be incomplete, and the results are for reference only.
Set Goal ACOS
Set a Goal ACOS based on your profit margin and advertising objective. A lower target may reduce bids and limit ad delivery. Review performance after launch and adjust the target when needed.
Set Total budget
Set the daily total budget for this product. The AI dynamically allocates this amount across multiple campaigns.
Goal name
Name your AI Ad (you can keep the default or enter a custom name).
AI Strategy Mode
Choose a strategy (Conservative / Aggressive / New Product) that fits your goals.
(Optional) More Settings
Expand this section to add advanced inputs:
Keywords: add specific keywords with Exact match.
Negative Keywords: add keywords to all campaigns within the AI Ad as Negative Phrase.
Product Targeting: add target ASINs with Exact match.
Negative Products: add ASINs to all campaigns within the AI Ad as Negative.Submit
Click Create AI Ad to launch.


After Creation
A newly created AI Ad may show "Creating" for a short period. The system may disable the toggle during this phase.
If the system notifies you that only one AI Ad can run per product at a time, please pause or stop the existing AI Ad before launching a new one.
Frequently Asked Questions
Can I use Less2More AI Ad for a product with a low quality score?
Yes, but it is not recommended. For better advertising performance, optimize the product and listing based on the diagnosis results before launching ads.
Can I use Less2More AI Ad for a new product that may not yet meet all of the requirements above?
Yes. However, because a new product may not have accumulated enough data, it may need a longer period to test suitable traffic sources and conversion performance. Less2More AI Ads cannot replace the market competitiveness of the product and listing. Optimize the product and listing first, then use AI Ads to support subsequent advertising management and optimization.